“ First impression is the best impression ”
Nowadays most of the mobile applications have onboard screens. Because in mobile apps, retaining users is more important than user acquisition. If users don’t understand how to use your app, they won’t use it. So that we need this onboard screens.
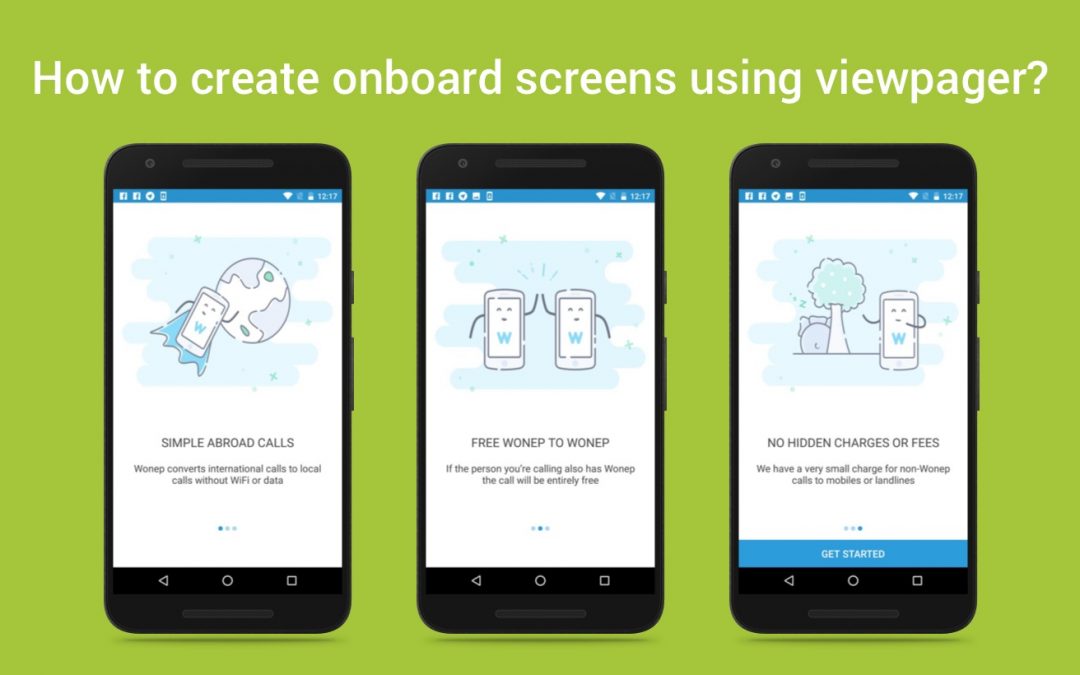
Onboard screens can be referred to as the simple walkthroughs that introduce users to how an app can be used and what it can accomplish. This obviously increases the likelihood that new users understand what it is about, what tasks it can do and how to use it to do them.
Techniques :
These three techniques are the most common.
- Benefits-oriented onboarding: With this technique, you present the benefits of the app.
- Function-oriented onboarding: It focuses the apps key functionality.
- Progressive onboarding: This process is interactive, providing the user with instructions as they actually use the app.

Guidelines :
- Keep it to a few quick screens. 3-4 is fine.
- Use your visual design elements strategically to set their expectations of your brand.
- Maintain visual continuity throughout characters, environments, style, typography, and button colours.
- Prioritise to only showcase the main benefits.
- Don’t explain the features. Remind them of how this app will make them a happier, better, more successful version of themselves.
- It must be presented before any registration process.
- Make it clear that the only thing the user needs to do is swipe or click the navigation buttons.
So let’s start this by creating a simple app. It will show you a simple way to quickly create onboard screens to your Android app.
- Create an activity with the viewpager, get started CTA button and the layout for carousel indicators using the following xml code.
| <?xml version="1.0" encoding="utf-8"?> | |
| <RelativeLayout | |
| android:layout_width="match_parent" | |
| android:layout_height="match_parent"> | |
| <android.support.v4.view.ViewPager | |
| android:id="@+id/pager_introduction" | |
| android:layout_width="match_parent" | |
| android:layout_height="match_parent" | |
| android:layout_above="@+id/viewPagerCountDots" /> | |
| <LinearLayout | |
| android:id="@+id/viewPagerCountDots" | |
| android:layout_width="match_parent" | |
| android:layout_height="@dimen/pager_height" | |
| android:layout_alignParentLeft="true" | |
| android:gravity="center" | |
| android:orientation="horizontal" /> | |
| </RelativeLayout> |
- Then create a layout for the viewpager item and add the needed controls based on your design. Here I just use an imageview and two textviews into the linearlayout.
| <LinearLayout | |
| android:layout_width="match_parent" | |
| android:layout_height="match_parent" | |
| android:orientation="vertical"> | |
| <ImageView | |
| android:layout_marginTop="50dp" | |
| android:id="@+id/iv_onboard" | |
| android:layout_width="match_parent" | |
| android:layout_height="@dimen/ob_banner_height" | |
| android:gravity="center" | |
| android:src="@drawable/onboard_page1" /> | |
| <RelativeLayout | |
| android:layout_below="@+id/iv_onboard" | |
| android:layout_width="match_parent" | |
| android:layout_height="match_parent"> | |
| <LinearLayout | |
| android:layout_centerVertical="true" | |
| android:orientation="vertical" | |
| android:layout_width="match_parent" | |
| android:layout_height="wrap_content"> | |
| <TextView | |
| android:id="@+id/tv_header" | |
| android:text="@string/ob_header1" | |
| android:textSize="@dimen/ob_header_text_size" /> | |
| <TextView | |
| android:id="@+id/tv_desc" | |
| android:text="@string/ob_desc1" | |
| android:textColor="@color/ob_desc" | |
| android:textSize="@dimen/ob_desc_text_size" /> | |
| </LinearLayout> | |
| </RelativeLayout> | |
| </LinearLayout> |
- Create the drawable’s for the carousel indicators. For this use the below snippet.
| <?xml version="1.0" encoding="utf-8"?> | |
| <shape xmlns:android="http://schemas.android.com/apk/res/android" | |
| android:shape="oval" android:useLevel="true" | |
| android:dither="true"> | |
| <size android:height="@dimen/pager_dot_size" android:width="@dimen/pager_dot_size"/> | |
| // Change the color based on the indicator states | |
| <solid android:color="@color/selected_dot"/> | |
| </shape> |
- Now create and set adapter for the viewpager, for this first you need to specify the data for the onboarding screens like image source and also the texts.
| public void loadData() | |
| { | |
| int[] header = {R.string.ob_header1, R.string.ob_header2, R.string.ob_header3}; | |
| int[] desc = {R.string.ob_desc1, R.string.ob_desc2, R.string.ob_desc3}; | |
| int[] imageId = {R.drawable.onboard_page1, R.drawable.onboard_page2, R.drawable.onboard_page3}; | |
| for(int i=0;i<imageId.length;i++) | |
| { | |
| OnBoardItem item=new OnBoardItem(); | |
| item.setImageID(imageId[i]); | |
| item.setTitle(getResources().getString(header[i])); | |
| item.setDescription(getResources().getString(desc[i])); | |
| onBoardItems.add(item); | |
| } | |
| } |
| private ViewPager onboard_pager; | |
| private OnBoard_Adapter mAdapter; | |
| onboard_pager = (ViewPager) findViewById(R.id.pager_introduction); | |
| mAdapter = new OnBoard_Adapter(this,onBoardItems); | |
| onboard_pager.setAdapter(mAdapter); |
- Then add some simple and awesome slide up and down translate animation for the CTA Get Started button.
| // Slideup animation | |
| <?xml version="1.0" encoding="utf-8"?> | |
| <translate xmlns:android="http://schemas.android.com/apk/res/android" | |
| android:fromYDelta="100%p" android:toYDelta="0%p" | |
| android:duration="@android:integer/config_longAnimTime"/> | |
| // Slidedown animation</pre> | |
| <?xml version="1.0" encoding="utf-8"?> | |
| <translate xmlns:android="http://schemas.android.com/apk/res/android" | |
| android:fromYDelta="0%p" android:toYDelta="100%p" | |
| android:duration="@android:integer/config_longAnimTime"/> |
- Hide the CTA button in all the other screens and show it into the last screen based on the page selection using the viewpager pagechangelistener.
| onboard_pager.addOnPageChangeListener(new ViewPager.OnPageChangeListener() { | |
| @Override | |
| public void onPageScrolled(int position, float positionOffset, int positionOffsetPixels) { | |
| } | |
| @Override | |
| public void onPageSelected(int position) { | |
| // Change the current position intimation | |
| for (int i = 0; i < dotsCount; i++) { | |
| dots[i].setImageDrawable(ContextCompat.getDrawable(OnBoardingActivity.this, R.drawable.non_selected_item_dot)); | |
| } | |
| dots[position].setImageDrawable(ContextCompat.getDrawable(OnBoardingActivity.this, R.drawable.selected_item_dot)); | |
| int pos=position+1; | |
| if(pos==dotsCount&&previous_pos==(dotsCount-1)) | |
| show_animation(); | |
| else if(pos==(dotsCount-1)&&previous_pos==dotsCount) | |
| hide_animation(); | |
| previous_pos=pos; | |
| } | |
| @Override | |
| public void onPageScrollStateChanged(int state) { | |
| } | |
| }); |
- Finally, add the click listener to the CTA button and execute the code.
| private Button btn_get_started; | |
| btn_get_started = (Button) findViewById(R.id.btn_get_started); | |
| btn_get_started.setOnClickListener(new View.OnClickListener() { | |
| @Override | |
| public void onClick(View v) { | |
| Toast.makeText(OnBoardingActivity.this,"Redirect to wherever you want",Toast.LENGTH_LONG).show(); | |
| } | |
| }); |
I created a project on GitHub to demonstrate the things covered in this article.
Feel free to comment and share, keep watching this space get more updates on Android Stuff!
Jaison Fernando
Latest posts by Jaison Fernando (see all)
- Phone number auth using Firebase Authentication SDK - March 20, 2020
- Password-less email auth using Firebase Authentication SDK - March 9, 2020
- How to use SharedPreferences API in Android? - February 10, 2020