
Many popular apps allow their users to view URLs within the app. For handling this, developers had the choice of either launch a browser, or build their own in-app browser using WebViews. However, this options requires technical work to implement and delivers a browsing experience that the users aren’t used to.
To solve this problem, we can use Chrome Tabs from the Google support library. In this post, I’m going to explain what, why, and how to use “Chrome Custom Tabs” in your Android applications.
What is Chrome Custom Tabs?
Chrome Custom Tabs is a new way to show the web content in Android, which allows you to change Chrome looks and feels making the transition from app to web seamlessly. It allows loading a chrome tab within your app.
Why we use Chrome Tabs?
Launching the browser is a heavy weight context, so just imagine having an entry level smartphone and calling browser every time, a link is opened and also isn’t customizable, while WebViews don’t share the state with the browser and add maintenance overhead. But Custom Tab allows you to open web URLs within the context of your application using the Chrome Browser installed on the device. The performance difference between Chrome, Chrome Custom Tab and Webview is shown below.
What are all the benefits?
These are all the benefits of Custom Chrome Tab.
- It allows an app to customise the looks and feels of the Chrome instance. We can customise the toolbar, enter & exit animations.
- We can add custom actions to the Chrome toolbar, overflow menu and bottom toolbar.
- Allows the developer to pre-start Chrome and pre-fetch content for faster loading.
- The browser uses Google’s Safe Browsing to protect the user and the device from dangerous sites.
- Quickly return to the app with a single tap.
- If the user has turned on Data Saver, they will still benefit from it.
How to use Chrome Custom Tabs?
For this, you will need to have the Chrome app installed on your phone. Then you need to follow the steps for implementing Chrome tabs into your application.
Step 1: Add this dependency to your build.gradle (app) file.
| implementation 'com.android.support:customtabs:27.1.0' |
Step 2: Open the webpage in Chrome Custom Tabs.
| // Loading url | |
| String url = "https://droidmentor.com/"; | |
| // CustomTabsIntent.Builder used to configure CustomTabsIntent. | |
| CustomTabsIntent.Builder builder = new CustomTabsIntent.Builder(); | |
| // CustomTabsIntent used to launch the URL | |
| CustomTabsIntent customTabsIntent = builder.build(); | |
| // Open the Custom Tab | |
| customTabsIntent.launchUrl(this, Uri.parse(url)); |
Step 3: For the UI customization, use the following snippet.
| // Change the background color of the Toolbar. | |
| builder.setToolbarColor(ResourcesCompat.getColor(getResources(), R.color.colorPrimary, null)); | |
| // Configure custom enter and exit animations | |
| builder.setStartAnimations(this, R.anim.slide_in_right, R.anim.slide_out_left); | |
| builder.setExitAnimations(this, R.anim.slide_in_left, R.anim.slide_out_right); | |
| // Setting a custom back button | |
| builder.setCloseButtonIcon(BitmapFactory.decodeResource( | |
| getResources(), R.drawable.ic_arrow_back)); | |
| // Hide status bar once the user scrolls down the content | |
| builder.enableUrlBarHiding(); |
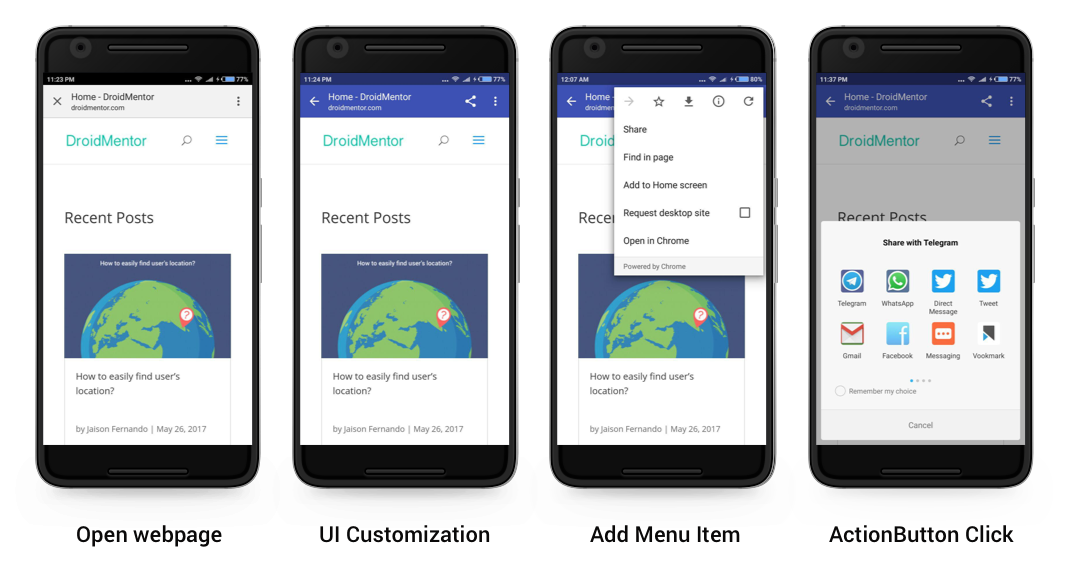
Step 4: For adding the action button, we need to pass 4 parameters into setActionButton().
The parameters are:
- icon: image source for the action button.
- description: accessible description string for the button.
- pendingIntent: Used to handle the action button click.
- tint: is a boolean that defines, if the action button should be tinted.
| builder.setActionButton(BitmapFactory.decodeResource(getResources(), | |
| R.drawable.ic_share), "Share", getItem(), true); | |
| private PendingIntent getItem() | |
| { | |
| Intent shareIntent = new Intent(Intent.ACTION_SEND); | |
| shareIntent.setType("text/plain"); | |
| shareIntent.putExtra(Intent.EXTRA_SUBJECT, "Droidmentor is a site, which contains android tutorials"); | |
| Log.d(TAG, "setMenuItem: "+url); | |
| shareIntent.putExtra(Intent.EXTRA_TEXT, url); | |
| return PendingIntent.getActivity(this, 0, shareIntent, 0); | |
| } |
Step 5: For adding the custom menu item, use addMenuItem().
| // Title and Callback PendingIntent as parameters | |
| builder.addMenuItem("Share", getItem()); |
I created a Gist on GitHub to demonstrate the things covered in this article.
View GistIf you find the article useful, please share it. Feel free to comment, keep watching this space get more updates on Android Stuff!
Jaison Fernando
Latest posts by Jaison Fernando (see all)
- Phone number auth using Firebase Authentication SDK - March 20, 2020
- Password-less email auth using Firebase Authentication SDK - March 9, 2020
- How to use SharedPreferences API in Android? - February 10, 2020