In this post, I’ll be covering the ML Kit’s face detection API and how you can build powerful features in your app around it.
With the release of Play services 7.8, Google announced that they’ve added new Mobile Vision APIs which provide face detection API that detects faces in an image, identify key facial features(eyes, ears, cheeks, nose, and mouth), along with expressions of every face detected, and get the contours of detected faces, quickly, easily and locally.
Now it becomes the part of the ML Kit and Google is making it more accessible and allowing developers to build more advanced features on top of it.
With face detection, you can get the information you need to perform tasks like embellishing selfies and portraits or generating avatars from a user’s photo. Because ML Kit can perform face detection in real-time.
Things you can do with face detection API.
There are a whole arsenal of powerful features ML Kit’s face detection API offers. To list out a few, here are the key capabilities you can find:
- Determine the bounds of the face and landmarks i.e.yes, ears, cheeks, nose, and mouth.
- It supports, face tracking feature. It simply gives us the ability to track a face in a video sequence
- The rotating angle of the detected face
- Determine the contours of detected faces and their eyes, eyebrows, lips, and nose.
- Determine whether a person is smiling or has their eyes closed.
- Provide the unique identifier for each individual person’s face that is detected and it’s consistent across invocations.
With this tutorial, you will learn everything that you need to know about face detection API. I will try to be as much detail as possible and will break down this tutorial to multiple steps for better understanding.
Let’s begin!
- API Setup
- Screen design
- Setup the Face Detector
- Detect the Face
- Decode the face detection results
1. API setup
Check your Google Play Services and make sure you have version 26 or higher. To get the latest version, in Android Studio click Tools > Android > SDK Manager
If you have not already added Firebase to your app, do so by following the steps in the getting started guide.
In your app, open the Gradle Scripts node, and select build.gradle (Module App), then add a dependency for the face detection API.
| implementation 'com.google.firebase:firebase-ml-vision:18.0.1' | |
| implementation 'com.google.firebase:firebase-ml-vision-face-model:17.0.2' |
Add the following snippet within the application tags of your manifest file, so that the MLKit face detector will be downloaded during the app installation not when it is required. This is optional but recommended configuration. android:value=”face” means it will download the Face detect model. You can change this or include multiple models
| <meta-data | |
| android:name="com.google.firebase.ml.vision.DEPENDENCIES" | |
| android:value="face" /> |
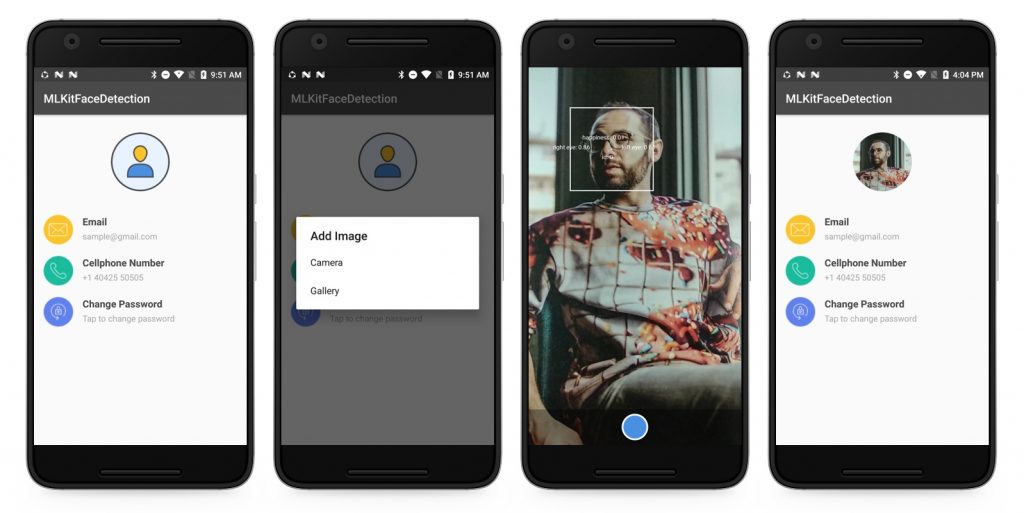
Now that your app is fully configured, it’s time to build a UI that should be able to select a photo either from the camera or from the gallery to detect the face and set the centre cropped image as profile picture in a circle imageview.
2. Screen Design
You need to create custom view classes CameraSourcePreview, GraphicOverlay to interact with the camera hardware and manage the content on the device screen.
For quicker integration, you can check the official sample project and use their classes from here. You need to include the following list of classes into your project.
- BitmapUtils: Utils functions for bitmap conversions.
- CameraSource: Manages the camera and allows UI updates. It receives preview frames from the camera at a specified rate.
- CameraSourcePreview: Preview the camera image in the screen.
- FrameMetadata: Describing frame info.
- GraphicOverlay: A view which renders a series of custom graphics to be overlayed on top of an associated preview.
- VisionImageProcessor: An interface to process the images with different ML Kit detectors and custom image models.
- VisionProcessorBase: Abstract base class for ML Kit frame processors.
- FaceDetectionProcessor & FaceContourDetectorProcessor: Derived from VisionProcessorBase, used to handle the detection results.
- FaceGraphic: Graphics instance for rendering face position, orientation, and landmarks within an associated graphics overlay view.
- FaceContourGraphic: Graphics instance for rendering face contours graphic overlay view.
3. Setup the Face Detector
To perform the face detection, you need to create an instance of FirebaseVisionFaceDetector, it helps you to detect the faces in a provided FirebaseVisionImage.
You could also customise the detector to detect different things or to opt-in or out of things that fit your specific use case by supplying a FirebaseVisionFaceDetectorOptions, using this you can configure few different properties for the recognition process.
Most of these options are self-explanatory, but we’ll look at a few of the common options.
- Face tracking – Used to assign the consistent and unique identifier for each individual person’s face that is detected.
- Classification Mode – Classifiers mode used determines whether a certain facial characteristic is present, such as “smiling” and “eyes open”.
- Contour Mode – Sets whether to detect contours or not.
- Landmark Mode – Sets whether to detect no landmarks or all landmarks.
- Performance Mode – option for controlling additional accuracy / speed trade-offs in performing face detection.
- Minimum face size – Used to set the smallest desired face size, expressed as a proportion of the width of the head to the image width. This value default is 0.1f.
| // To initialise the detector | |
| FirebaseVisionFaceDetectorOptions options = | |
| new FirebaseVisionFaceDetectorOptions.Builder() | |
| .setPerformanceMode(FirebaseVisionFaceDetectorOptions.ACCURATE) | |
| .setClassificationMode(FirebaseVisionFaceDetectorOptions.ALL_CLASSIFICATIONS) | |
| .enableTracking() | |
| .build(); | |
| FirebaseVisionFaceDetector detector = FirebaseVision.getInstance() | |
| .getVisionFaceDetector(options); |
After this, you need to create the Camera resource connect the FaceDetectionProcessor || FaceContourDetectorProcessor with it, then only you can get the results via the callbacks.
| // To connect the camera resource with the detector | |
| mCameraSource = new CameraSource(this, barcodeOverlay); | |
| mCameraSource.setFacing(CameraSource.CAMERA_FACING_FRONT); | |
| // Initialise & set the processor | |
| mCameraSource.setMachineLearningFrameProcessor(faceDetectionProcessor); |
To draw only the boundary of the face on top of the preview, then you can use the below snippet
| // To draw only the bounding rect around the face in the canvas | |
| faceDetectionProcessor = new FaceDetectionProcessor(detector); | |
| faceDetectionProcessor.setFaceDetectionResultListener(getFaceDetectionListener()); | |
| mCameraSource.setMachineLearningFrameProcessor(faceDetectionProcessor); |
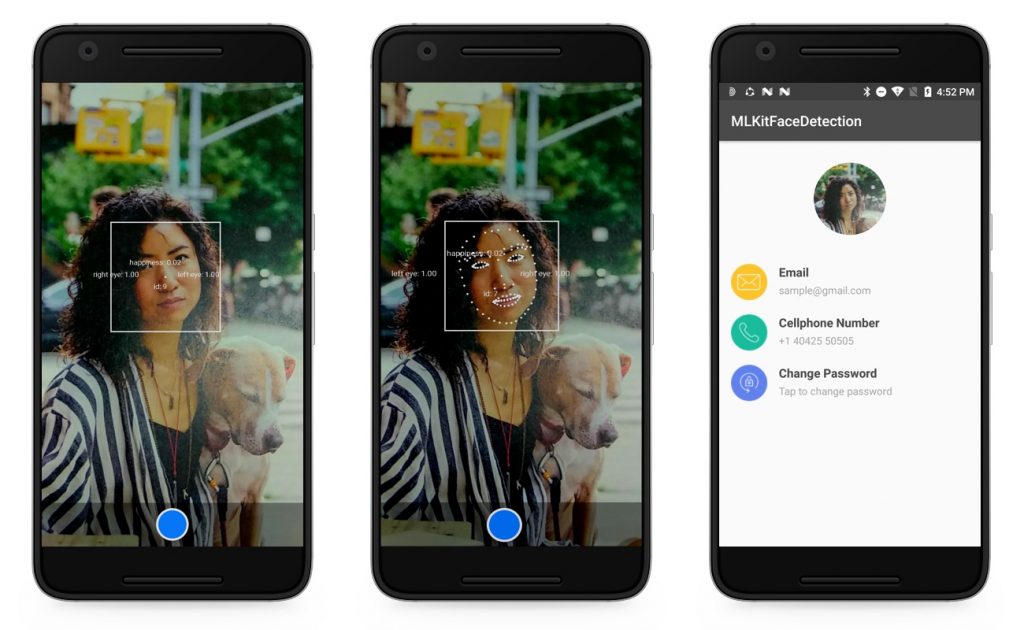
To plot the landmarks along with the boundary of the face on top of the preview, then use the below implementation
| /* To plot the landmarks of the face in the canvas | |
| For this you have to set ContourMode attribute as ALL_CONTOURS by using | |
| setContourMode(FirebaseVisionFaceDetectorOptions.ALL_CONTOURS) */ | |
| faceDetectionProcessor = new FaceContourDetectorProcessor(detector); | |
| faceDetectionProcessor.setFaceDetectionResultListener(getFaceDetectionListener()); | |
| mCameraSource.setMachineLearningFrameProcessor(faceDetectionProcessor); |
4. Detect the Face:
Now that your detector is set up and now you can perform the face recognition process. The thing is you can perform face recognition in an image only, for this first you need to create an instance of FirebaseVisionImage because it can be used for both on-device and cloud API detectors.
So in our real-time scanning process, the preview image or from the selected image from the gallery is converted as FirebaseVisionImage with metadata from the bitmap in our VisionProcessorBase class with the help of BitmapUtils.
| // To create the FirebaseVisionImage | |
| FirebaseVisionImageMetadata metadata = | |
| new FirebaseVisionImageMetadata.Builder() | |
| .setFormat(FirebaseVisionImageMetadata.IMAGE_FORMAT_NV21) | |
| .setWidth(frameMetadata.getWidth()) | |
| .setHeight(frameMetadata.getHeight()) | |
| .setRotation(frameMetadata.getRotation()) | |
| .build(); | |
| Bitmap bitmap = BitmapUtils.getBitmap(data, frameMetadata); | |
| FirebaseVisionImage firebaseVisionImage=FirebaseVisionImage.fromByteBuffer(data, metadata); |
This code is pretty straightforward — it creates a FirebaseVisionImage from the bitmap, now the FirebaseVisionFaceDetector instance to detect the faces in our image. This can be done by calling the detectInImage() function, passing in our FirebaseVisionImage instance. If the recognition operation succeeds, it returns a list of FirebaseVisionFace objects in the success listener.
| // To detect the faces from the image | |
| @Override | |
| protected Task<List<FirebaseVisionFace>> detectInImage(FirebaseVisionImage image) { | |
| return detector.detectInImage(image); | |
| } |
5. Decode the face detection results
Typically in this step, you would iterate through the list, and process each detected faces independently. Each FirebaseVisionFace object represents a face that was detected in the image.
From this object, you can get the bounding rectangle coordinates in the source image and also the landmarks and the contours from the face.
| // To decode the face detection results | |
| FaceDetectionResultListener faceDetectionResultListener = new FaceDetectionResultListener() { | |
| @Override | |
| public void onSuccess(@Nullable Bitmap originalCameraImage, @NonNull List<FirebaseVisionFace> faces, | |
| @NonNull FrameMetadata frameMetadata, @NonNull GraphicOverlay graphicOverlay) { | |
| boolean isEnable; | |
| isEnable = faces.size() > 0; | |
| for (FirebaseVisionFace face : faces){ | |
| // To get the results | |
| Log.d(TAG, "Face bounds : " + face.getBoundingBox()); | |
| // To get this, we have to set the ClassificationMode attribute as ALL_CLASSIFICATIONS | |
| Log.d(TAG, "Left eye open probability : " + face.getLeftEyeOpenProbability()); | |
| Log.d(TAG, "Right eye open probability : " + face.getRightEyeOpenProbability()); | |
| Log.d(TAG, "Smiling probability : " + face.getSmilingProbability()); | |
| // To get this, we have to enableTracking | |
| Log.d(TAG, "Face ID : " + face.getTrackingId()); | |
| } | |
| } | |
| @Override | |
| public void onFailure(@NonNull Exception e) { | |
| } | |
| }; |
As you can see we have quite a lot of features that this API is able to identify: the face contour, the mouth (both inner and outer lips), the eyes together with the pupils and eyebrows, the nose and the nose crest and, finally, the face oval.
Wrapping Up
In this tutorial, we explored MLKit Face Detection API and how to use this in an app. We set up a basic ImagePicker with the options to snap a photo in real time when a face is detected in the viewport or select an image from gallery and detect whether a person’s face is present in the image or not and set the image as a profile image of the user.
If you want to play around with the app explained in this post, you can build it from my demo GitHub repository and it should work well after adding it to your Firebase Project.
As you can see, MLKit face detection is a powerful API with many applications! I hope you enjoyed this, please let me know in the comments how did it go and if there are things that can be improved.
Stay tuned for the second part of the series on how to perform image manipulation on a particular person in a video stream.
Have fun!
Jaison Fernando
Latest posts by Jaison Fernando (see all)
- Phone number auth using Firebase Authentication SDK - March 20, 2020
- Password-less email auth using Firebase Authentication SDK - March 9, 2020
- How to use SharedPreferences API in Android? - February 10, 2020


