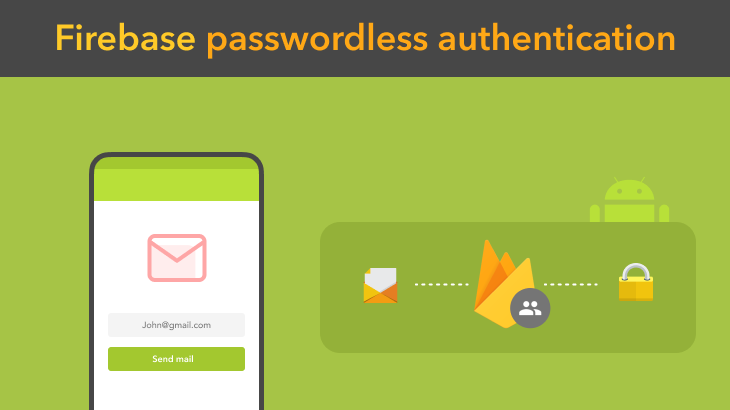
This post covers the password-less email auth method in Android applications using Firebase Auth SDK. Nowadays most of the apps have user profiling option, which allows the app to securely store the user data and provide the personalised experience across all of the user’s devices.
Firebase Authentication provides backend services, easy-to-use SDKs, and ready-made UI libraries to authenticate users to your app. It supports authentication using passwords, phone numbers, Email and popular identity providers like Google, Facebook and Twitter, and more.
In this tutorial, we will be learning about how to login and authenticate in our Android application with the help of Firebase Auth password-less email authentication method.
Prerequisites
To follow this tutorial, please make sure that you have the Google services enabled Android application and the Firebase application is created and ready to dive.
The first step is to, connect your application with Firebase project using Firebase assistant, you can just follow the official instructions because that’s pretty good.
Add the needed dependency in your build.gradle(app level)
| implementation 'com.google.android.gms:play-services-auth:17.0.0' | |
| implementation 'com.google.firebase:firebase-auth:19.2.0' | |
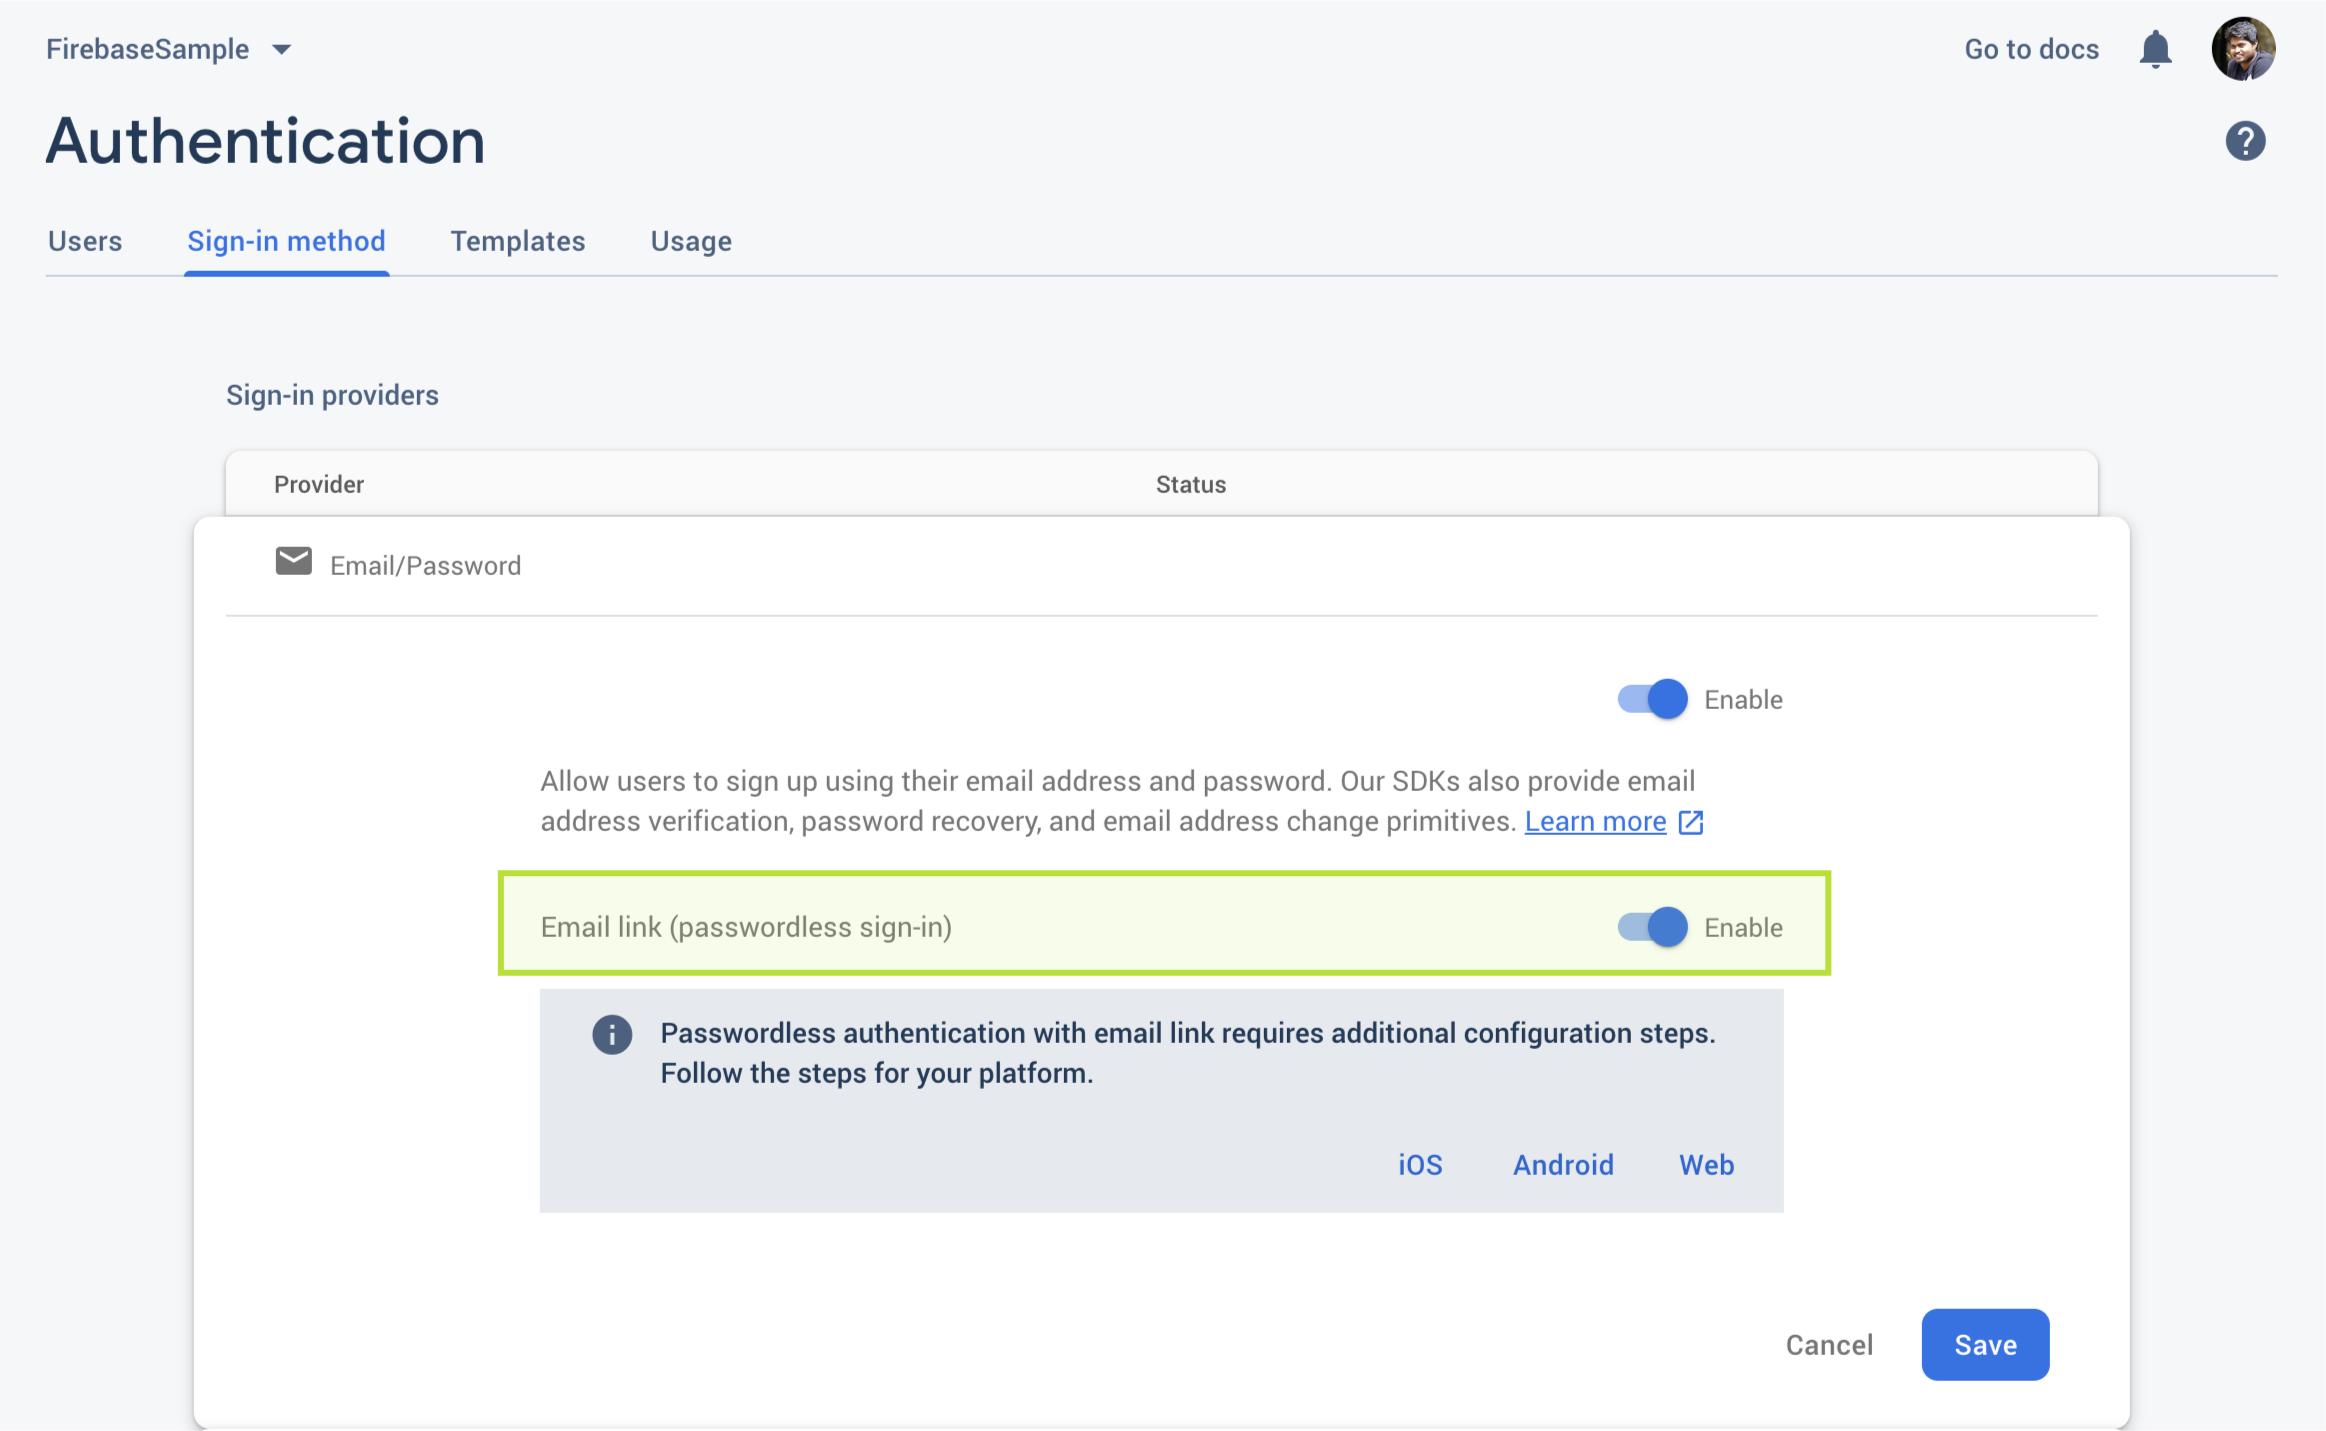
Enable the Email link(password less sign-in) authentication methodology in the Sign in method section in your Firebase console like below.

Add internet permission in your AndroidManifest.xml file.
| <uses-permission android:name="android.permission.INTERNET"/> | |
Connect Firebase Auth
We have already included the SDK, so we can jump straight into the implementation. Create FirebaseAuth instance and initialise it like this.
| private FirebaseAuth mAuth; | |
| mAuth = FirebaseAuth.getInstance(); | |
Create Action code settings, which contains the following constraints.
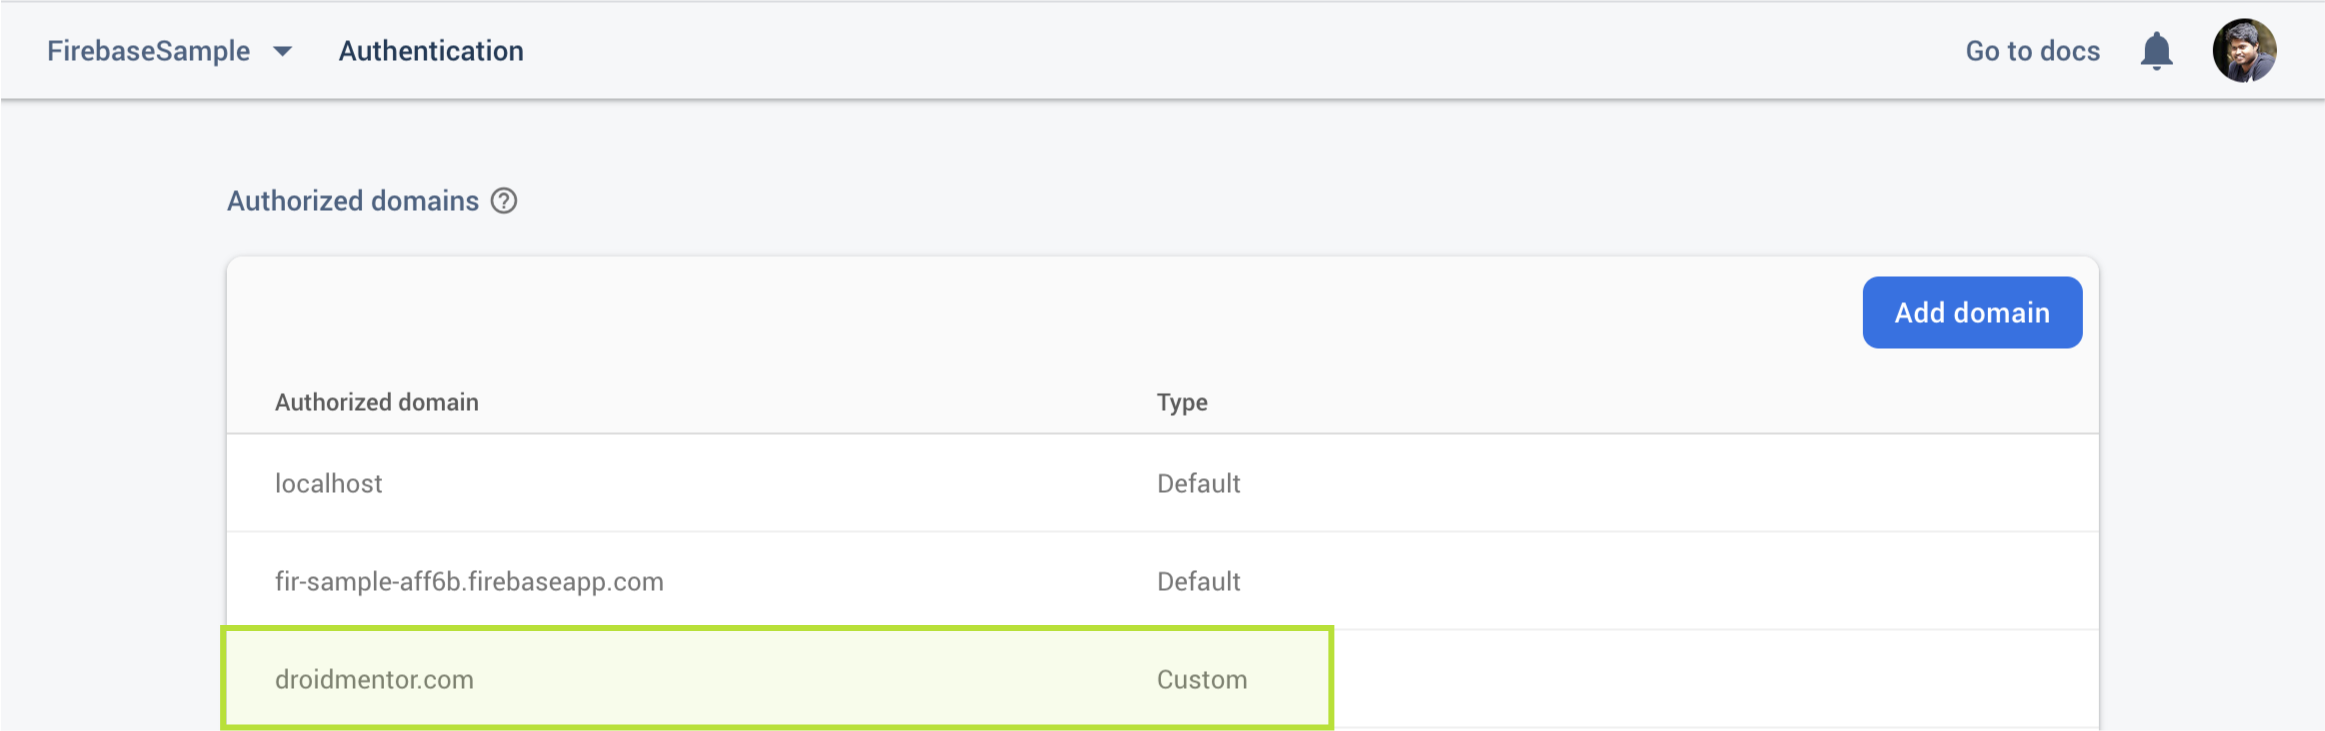
- Url – Redirection Url, add this domain as whitelisted from your firebase console

- Android package name – Use the current app package name, which is used to receive the redirection
- IOSBundleId – To handle the redirection in the iOS app, for this you have to register your IOS app first into your Firebase project
- HandleCodeInApp – Set this as always true, because the Email verification always ends up with Signing in into your app
- DynamicLinkDomain – To provide support for multiple custom dynamic links used in a single project
| ActionCodeSettings actionCodeSettings; | |
| actionCodeSettings = ActionCodeSettings.newBuilder() | |
| .setUrl("https://droidmentor.com/finishSignUp") | |
| .setHandleCodeInApp(true) | |
| .setAndroidPackageName("com.droidmentor.firebaseservicesdemo", false, null) | |
| .build(); | |
For the full API spec, check out the Firebase ActionCodeSettings doc.
Initiate Email authentication
To send the authentication link to the user’s Email we need to tell the Firebase Auth library by calling the sendSignInLinkToEmail method along with the Email ID and the Action code settings which we have created in the previous step and the callback functions are pretty self-explanatory, that’s it. Firebase Auth will take care of the rest.
| mAuth.sendSignInLinkToEmail(emailID, actionCodeSettings) | |
| .addOnCompleteListener(new OnCompleteListener<Void>() { | |
| @Override | |
| public void onComplete(@NonNull Task<Void> task) { | |
| Log.d(TAG, "onComplete: "); | |
| if (task.isSuccessful()) { | |
| Log.d(TAG, "Email sent."); | |
| } else { | |
| Objects.requireNonNull(task.getException()).printStackTrace(); | |
| } | |
| } | |
| }); | |
Note: This task may fail with the following exception when you missed adding the domain in your whitelisted domains.
| System.err: com.google.firebase.FirebaseException: An internal error has occurred. | |
| [ UNAUTHORIZED_DOMAIN:Domain not whitelisted by project ] | |
You may end up with the following exception when you haven’t activated the Dynamic links and verify your domain.
| com.google.firebase.auth.FirebaseAuthException: Please activate Dynamic Links in the | |
| Firebase Console and agree to the terms and conditions. | |
Now that you have your auth system setup in place because when you complete all the above-mentioned steps, you’ll end up with receiving emails from Firebase. Moving on, now let’s handle the sign-in process completion with the email verification link.
Verify the results
For security reasons, the Firebase team needs the Email address while completing the sign-in process, so that they can match the source email id and the verification link. So need to store the Email ID while initiating the process locally(Shared preference or SavedInstanceState) to complete the sign-in flow.
To handle the dynamic links in our Android application at first, add the package name and the and the SHA-1/SHA-256 key into the Firebase project settings and then add the following constraints into the redirection activity node in your AndroidManifest.xml file
| <activity android:name=".MailAuthenticationActivity"> | |
| <intent-filter> | |
| <action android:name="android.intent.action.VIEW"/> | |
| <category android:name="android.intent.category.DEFAULT"/> | |
| <category android:name="android.intent.category.BROWSABLE"/> | |
| <data android:host="droidmentor.com" android:scheme="https"/> | |
| </intent-filter> | |
| </activity> | |
Now you can get the redirection to the above-mentioned activity while clicking the verification link from your app installed mobile device. Get the email link from your intent bundle extras and verify it by using the isSignInWithEmailLink() method
| Intent intent = getIntent(); | |
| String emailLink = intent.getData().toString(); | |
| mAuth.isSignInWithEmailLink(emailLink) | |
Right after the verification, initiate the sign in process by using the already stored Email ID and the verification link received from the above step
| mAuth.signInWithEmailLink(emailID, emailLink) | |
| .addOnCompleteListener(new OnCompleteListener<AuthResult>() { | |
| @Override | |
| public void onComplete(@NonNull Task<AuthResult> task) { | |
| if (task.isSuccessful()) { | |
| Toast.makeText(activity, "Successfully signed in with email link!", Toast.LENGTH_SHORT).show(); | |
| if (task.getResult() != null && task.getResult().getUser() != null) { | |
| FirebaseUser user = task.getResult().getUser(); | |
| if (!TextUtils.isEmpty(user.getUid())) | |
| Log.d(TAG, "signInWithCredential: " + user.getUid()); | |
| } | |
| } | |
| } | |
| }); | |
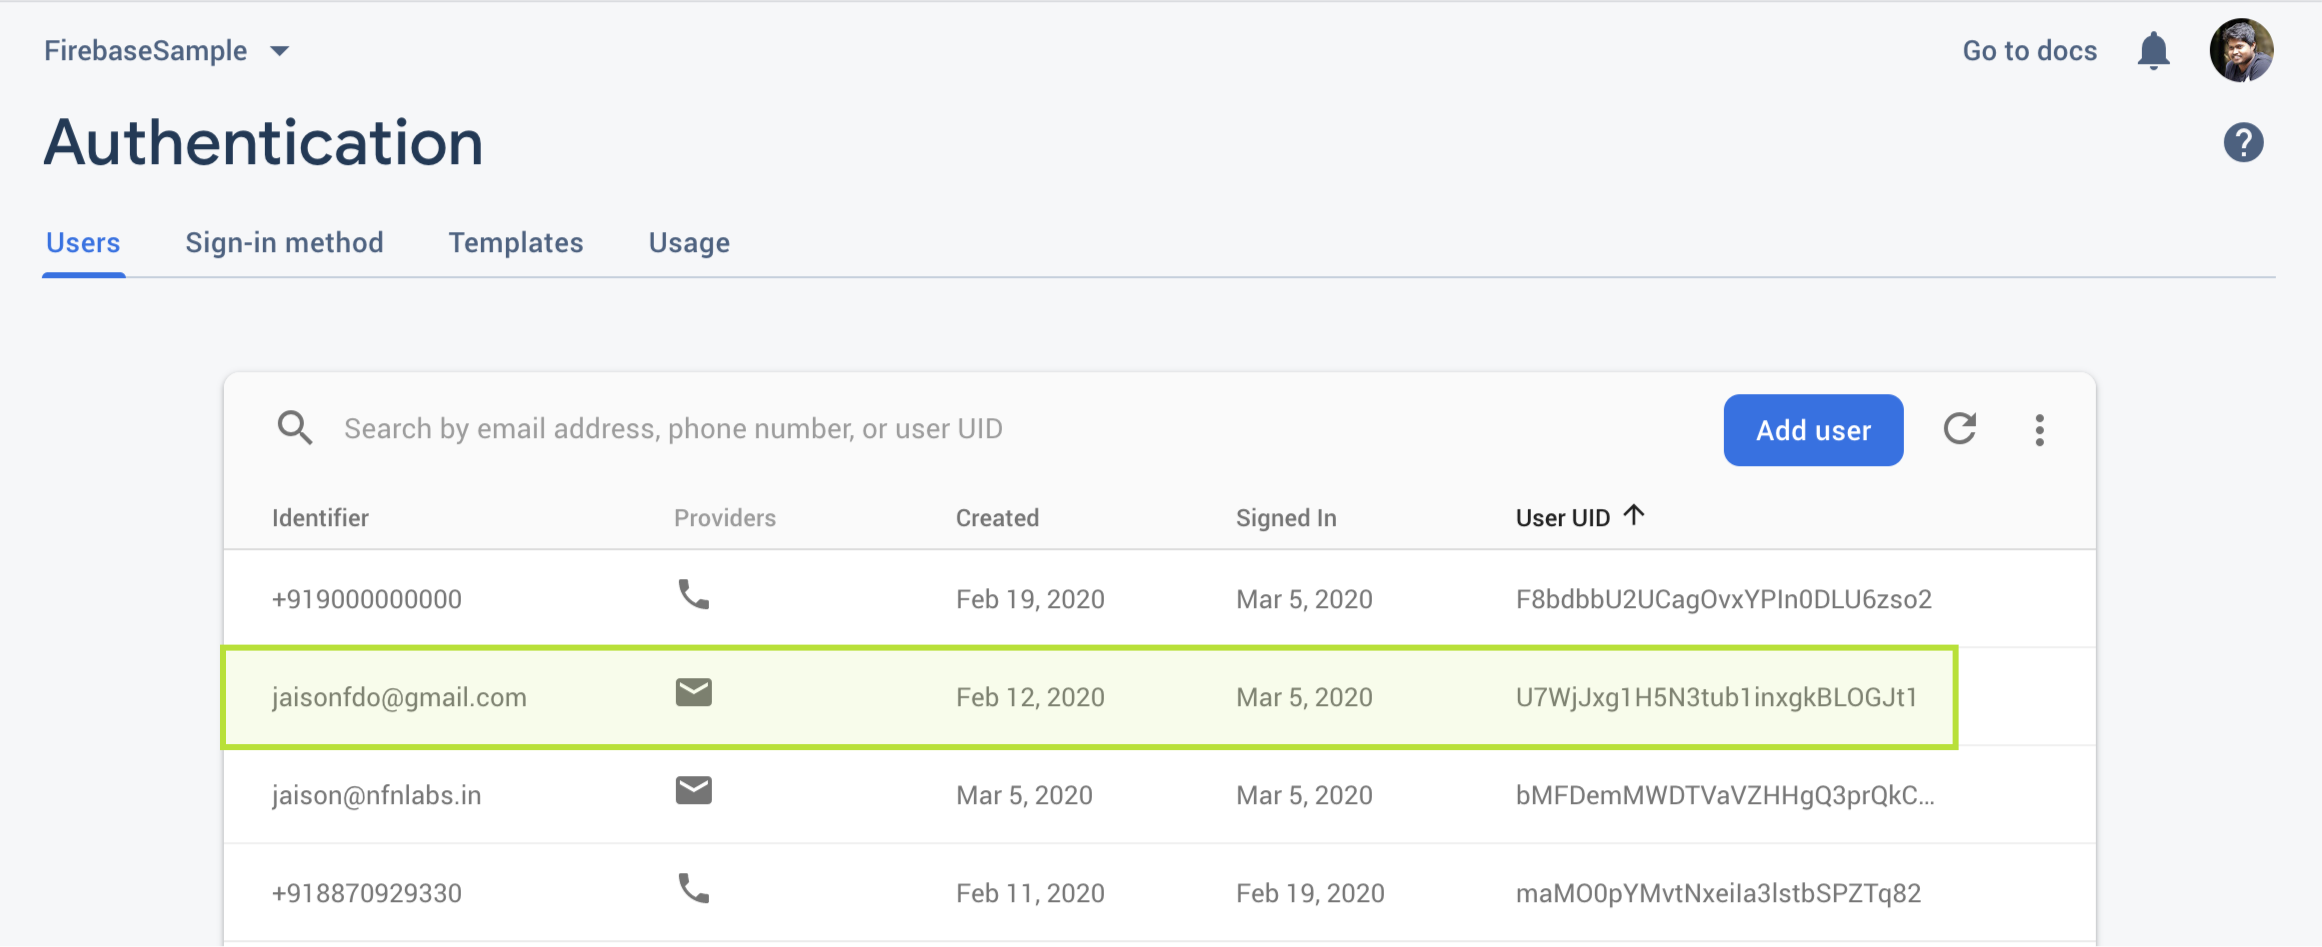
To verify that the user has been created, go to the Authentication > Users screen in your Firebase console as shown below and find the user’s record.
Bonus
As of now, due to security concerns, we can’t change the Email template, but the Firebase team provides the option to change the language to support localisation, to use this specific feature, all we need to do is
| // For example use *es* for Spanish | |
| mAuth.setLanguageCode("YOUR_LANGUAGE_CODE"); | |
Wrapping up
You have now successfully integrated simple authentication flow using Firebase Auth in your Android application and it’s working now.
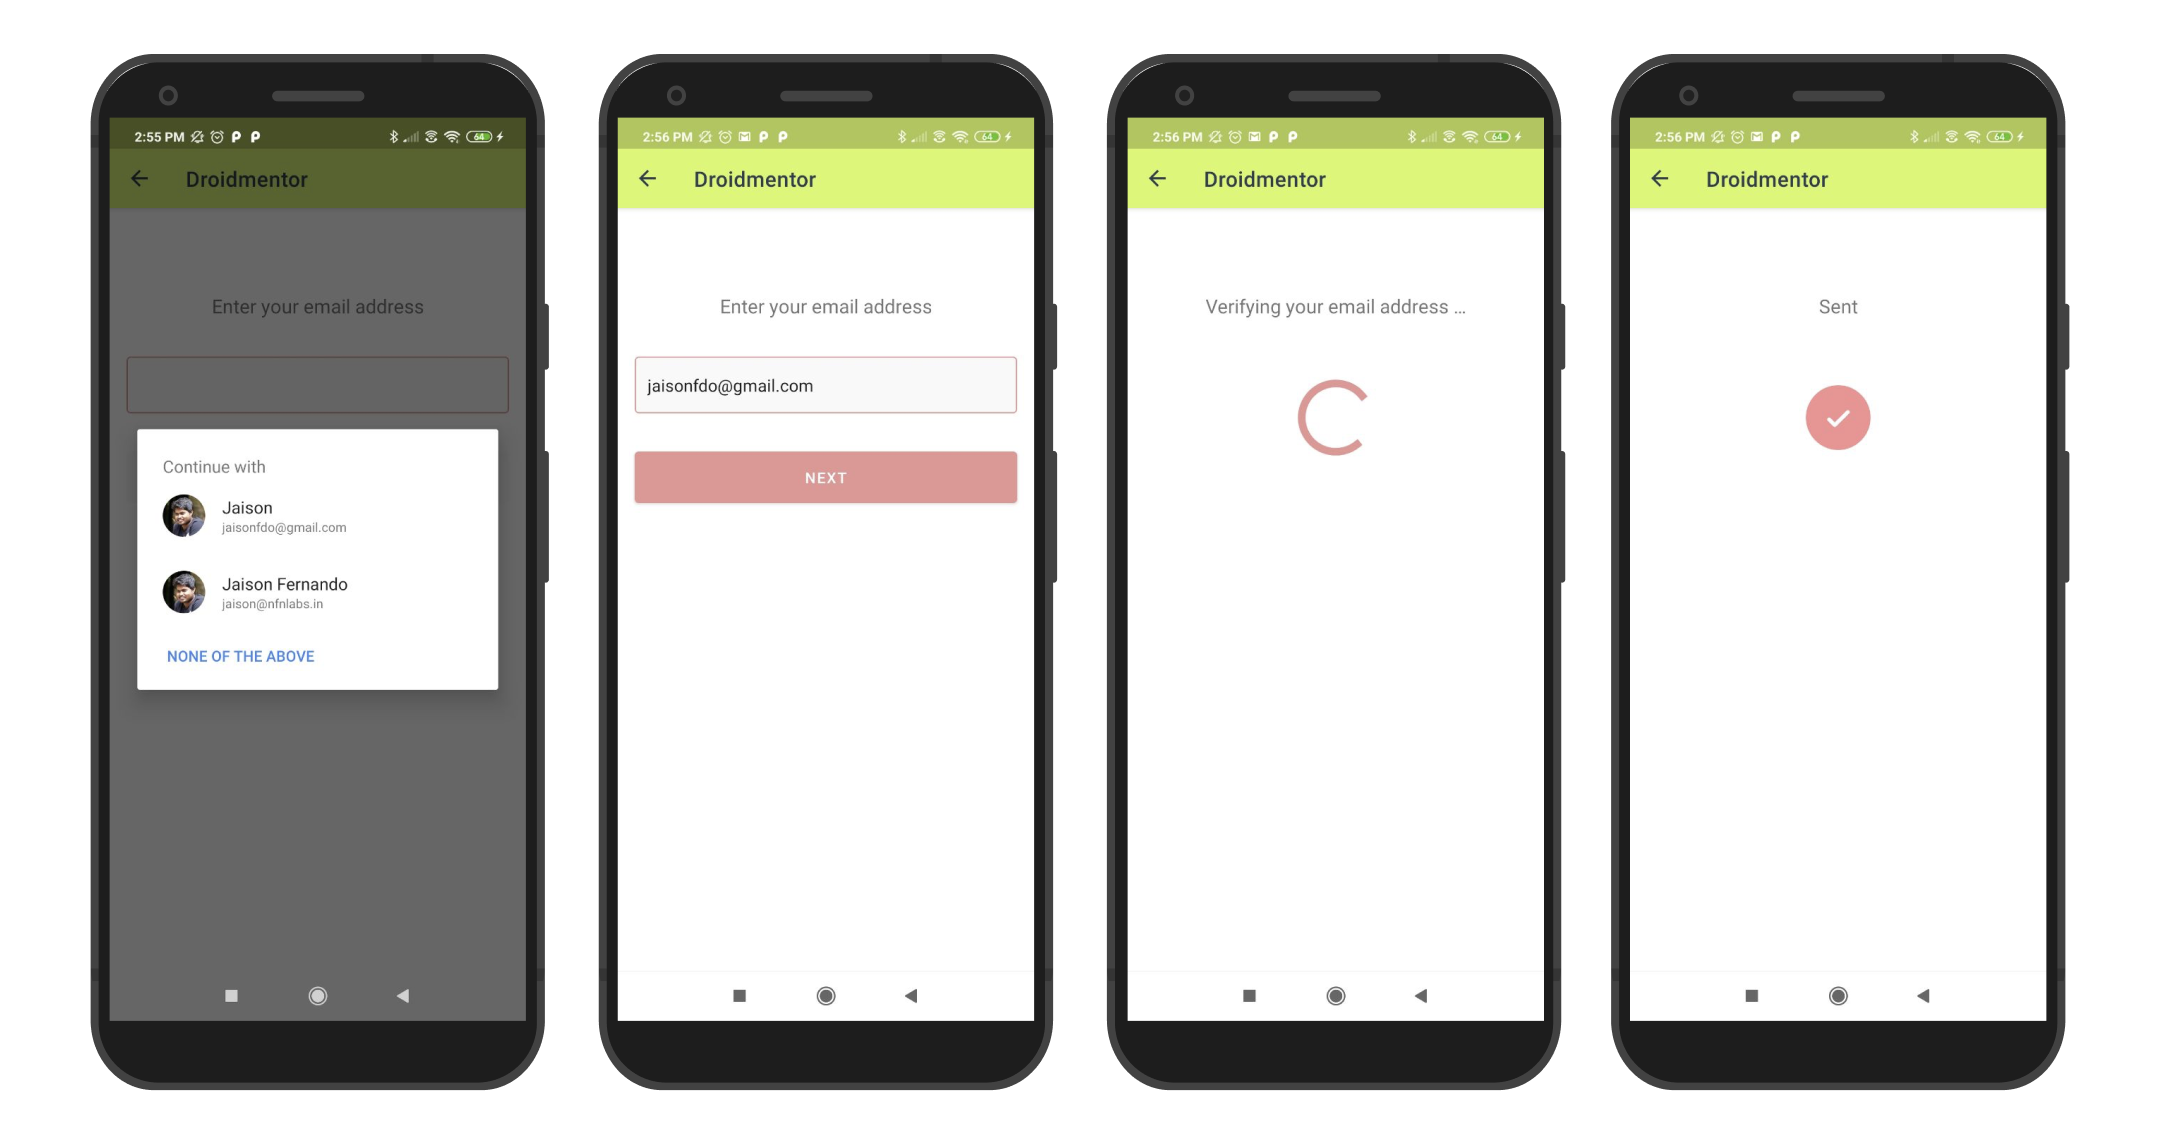
After working with the very same verification flow for multiple times, ends with handling the following states with part of this implementation
- Input field for the Email ID and the Hint suggestion
- Verification in progress state
- Verification mail sent
- Resend the verification e-mail
- Open the mail app
- Verification completion
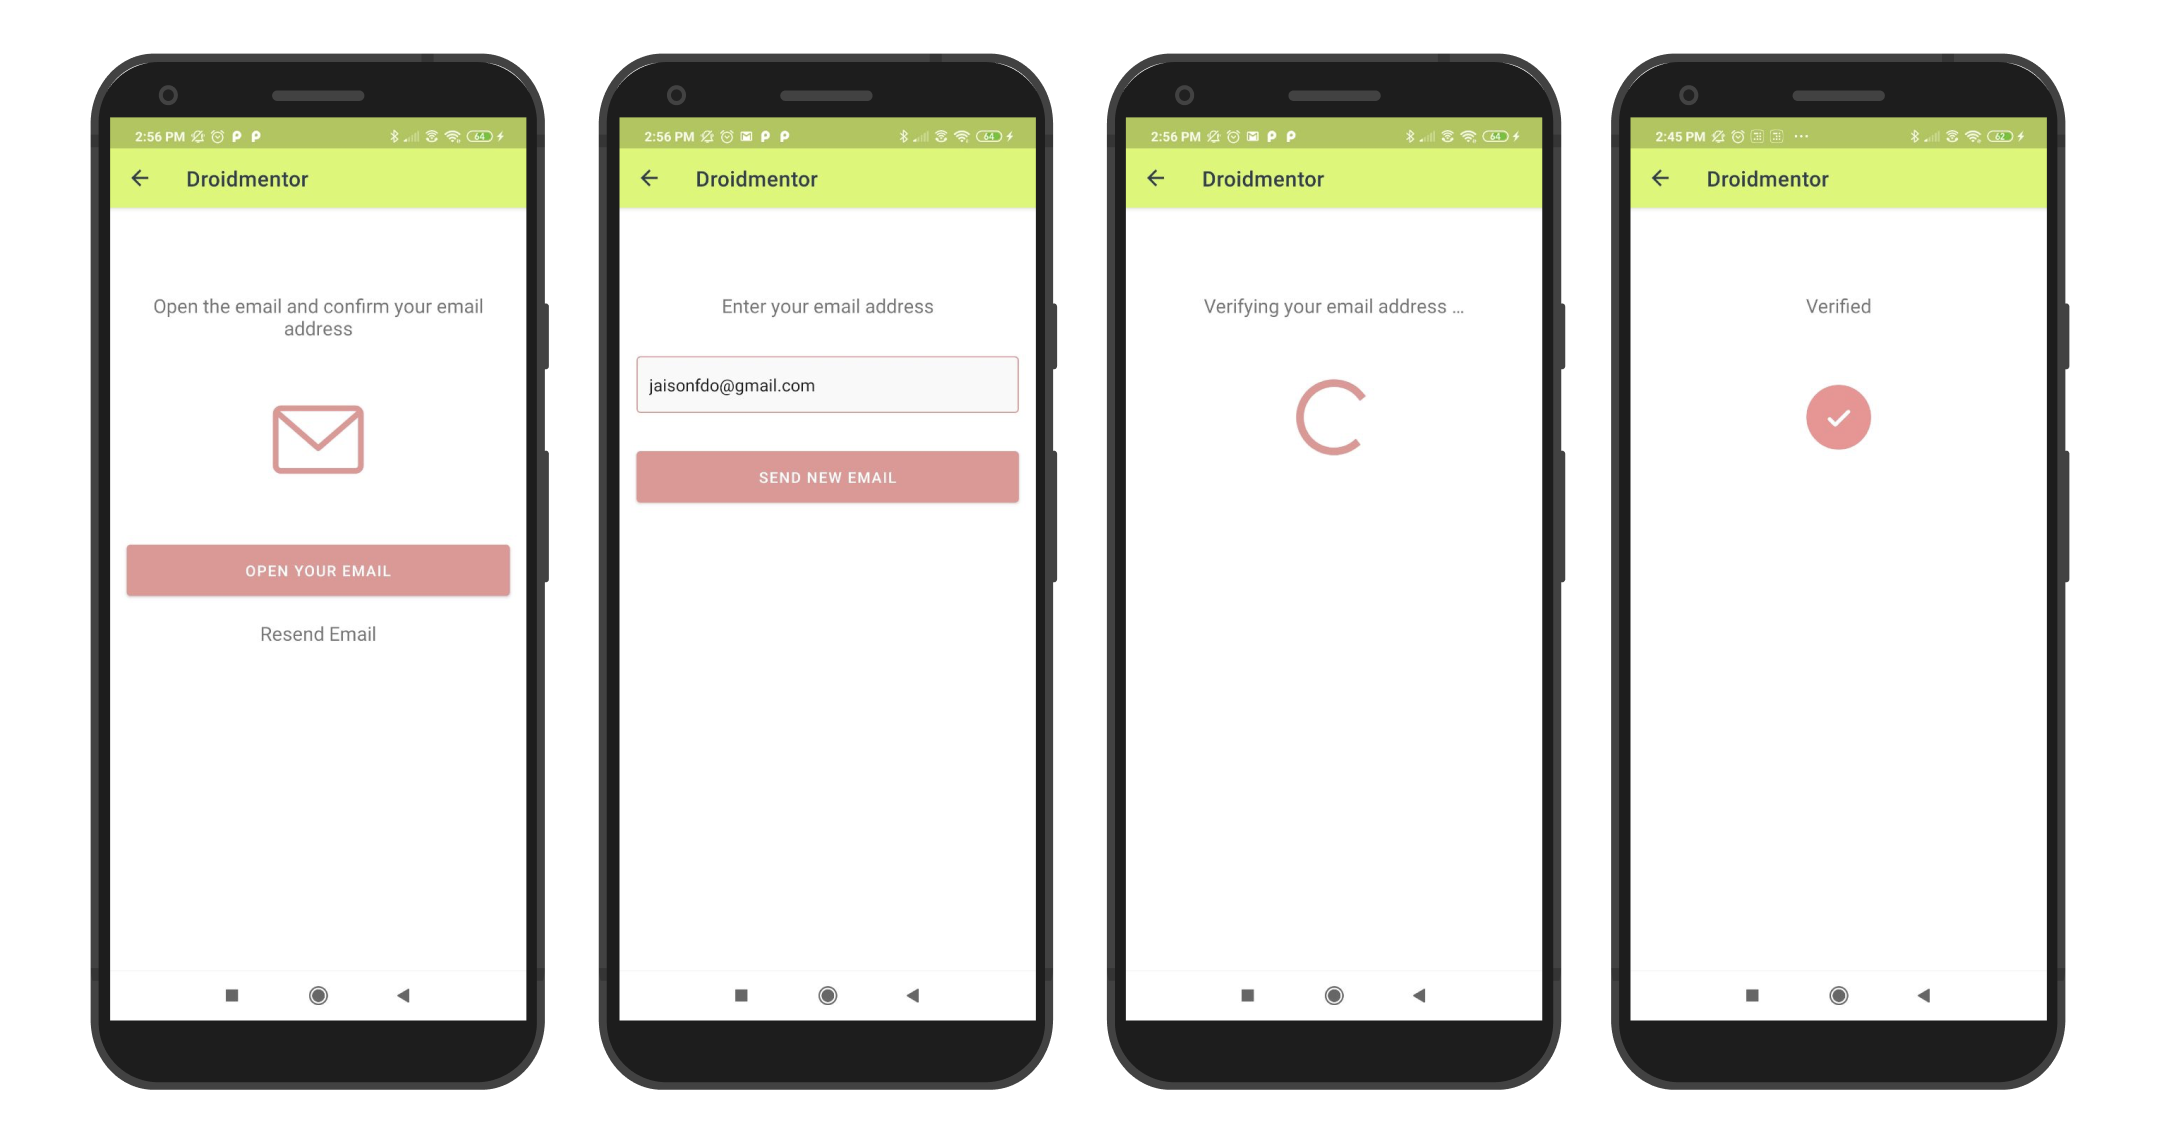
I have created a reusable component to handle this Firebase Auth process and another component to handle all the intermediate screens using ViewStub.
If you need to take a look at the code for this, you can refer to this GitHub repo and it should work well after adding it to your Firebase Project.
That’s it for now. If you have any questions or suggestions (like use cases you want to be covered) don’t hesitate to write them in the comments.
Have fun!
Jaison Fernando
Latest posts by Jaison Fernando (see all)
- Phone number auth using Firebase Authentication SDK - March 20, 2020
- Password-less email auth using Firebase Authentication SDK - March 9, 2020
- How to use SharedPreferences API in Android? - February 10, 2020