
How to add In-App Purchases in your Android app?
In-app purchase (IAP) is a great way to earn money from your Android app. IAP is mostly used to unlock some additional features in your app that you want to monetise from. Monetisation is one of the most important aspects of distributing your product to the rest of the world. Like it or not, Google charges 30% of each successful transaction that your app will make.
Based on the available API’s we can classify IAP products into two types.
Managed in-app products:
Products are managed by the developer, you can decide if you want to handle your managed products as non-consumable or consumable items.
- Consumable product: It is usually temporary and, once consumed, can be bought again, For example, the user’s in-game character might gain life points or gain extra gold coins in their inventory.
-
Non-consumable product: It can only be purchased once in your application and provide a permanent benefit. Once purchased, these products will be permanently associated to the user’s Google account. For example, upgrading an app to pro version, or removing ads
Subscriptions:
A payment that will unlock features of your app for a limited amount of time(days, weeks, months, years). Billing continues indefinitely at the interval and price specified for the subscription. When a subscription is not renewed, the product is no longer active for the user.
With this tutorial, you will learn everything that you need to know about In-App Purchases. I will try to be as much detailed as possible, and will break down this tutorial to multiple steps for better understanding:
Let’s begin!
- Adding the Play Billing Library to your app
- Configuring the products
- Implementing Purchase helper to your app
- Get the purchase history
- Get the product details
- Initiating a Google Play In-app Billing Purchase
- Redirects to Manage Subscription
- Cancel an active subscription
After implementing thins IAP in multiple projects, I thought why not this be done with a single util class. So I’ll explain the above-mentioned steps using the helper class.
1. Adding the Play Billing Library to your app:
Just add the following dependency in your project.
| implementation 'com.android.billingclient:billing:1.1' |
Add internet permission in your AndroidManifest.xml file. Embedded billing permission inside the library’s manifest. It’s not necessary to add the com.android.vending.BILLING permission inside Android manifest anymore.
| <!-- To use internet --> | |
| <uses-permission android:name="android.permission.INTERNET" /> |
… sync your project.
2. Configuring the products:
In order to have the IAP within your app, you must first configure your in-app products using the Google Play Console. Since this article is more oriented towards play-billing library implementation, I won’t get into too much detail about how to configure the products. I suggest you read this by yourself from the official documentation because it’s quite self-explanatory with examples too.
Create a manage product
Create a subscription
Sounds easy enough, right?
3. Implementing Purchase helper to your app:
To implement our PurchaseHelper util into your app, you need to declare and define the object with the callback interface (PurchaseHelperListener), which will give you the response of your specific query. You can use the following code snippet
| PurchaseHelper purchaseHelper; | |
| purchaseHelper = new PurchaseHelper(this, getPurchaseHelperListener()); | |
| public PurchaseHelper.PurchaseHelperListener getPurchaseHelperListener() { | |
| return new PurchaseHelper.PurchaseHelperListener() { | |
| @Override | |
| public void onServiceConnected(int resultCode) { | |
| Log.d(TAG, "onServiceConnected: " + resultCode); | |
| } | |
| @Override | |
| public void onSkuQueryResponse(List<SkuDetails> skuDetails) { | |
| } | |
| @Override | |
| public void onPurchasehistoryResponse(List<Purchase> purchasedItems) { | |
| purchaseHistory = purchasedItems; | |
| } | |
| @Override | |
| public void onPurchasesUpdated(int responseCode, @Nullable List<Purchase> purchases) { | |
| Log.d(TAG, "onPurchasesUpdated: " + responseCode); | |
| } | |
| }; | |
| } |
4. Get the purchase history
Before launching the billing flow we have to check the status of the product, to check the history of the purchase. You can make the request to get all the already purchased items. You can achieve this by making a simple function call
| // You can pass BillingClient.SkuType.INAPP || BillingClient.SkuType.SUBS | |
| purchaseHelper.getPurchasedItems(TYPE); |
It will return the response of this request into our callback function onPurchasehistoryResponse(List
5. Get the product details
To show the details about the products, we have to get the details from our play console using the product ID. For this, we have to pass the list of product Ids and the SkuType. You can get the product details by using the following snippet.
| purchaseHelper.getSkuDetails(skuList,BillingClient.SkuType.INAPP); |
It will return the response of this request into our callback function onSkuQueryResponse(List
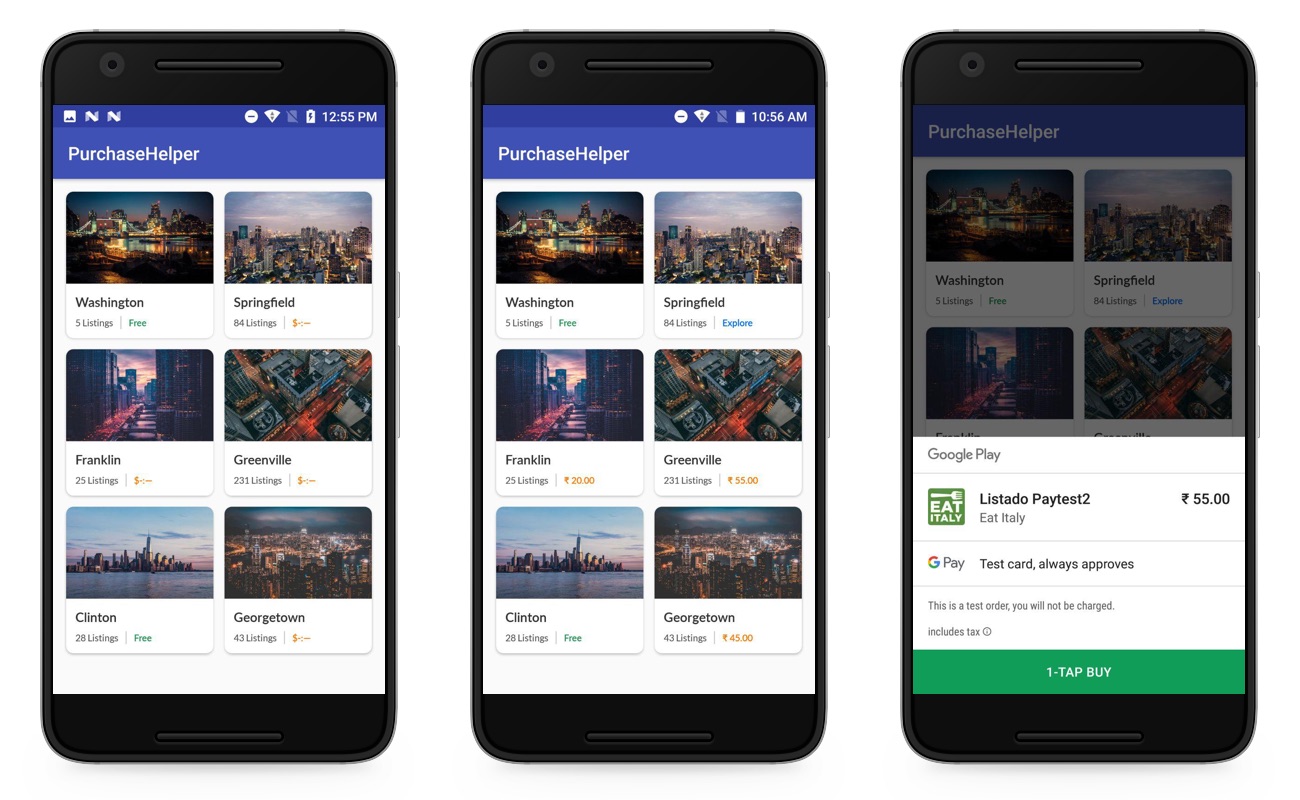
6. Initiating a Google Play In-app Billing Purchase
To initiate the In-app Billing Purchase, you have to pass SkuType and the product ID
| purchaseHelper.launchBillingFLow(BillingClient.SkuType.INAPP, getProduct_id()); |
It will return the response of this request into our callback function onPurchasesUpdated(int responseCode, @Nullable List
7. Redirects to Manage Subscription
To manage our subscriptions, in the earlier days, can we redirect the users only to the Play Store on your app’s page and the user have to figure out where to click next to cancel the subscription. But now In 2018 I/O, the play billing team included a nice add-on, that we can easily redirect the user to the “Manage subscription” page for your app.
You can do this by using the following function call, the single line makes your life easier.
| purchaseHelper.gotoManageSubscription(); |
8. Cancel an active subscription:
In Android, Currently, the Google Play Billing library does not provide support for programmatically cancelling subscriptions from inside the purchasing app. It is only available within the Play Store app.
We can cancel the subscriptions via Google Play Developer API. To cancel the subscription we need the following parameters
- The package name of the app
- Purchased subscription ID
- PurchaseToken provided to the user’s when the subscription was purchased.
As a developer, we never like to provide an option to cancel the subscription. But this will be more useful to the user. If the user likes our app and the subscribed feature, then they will never use this option. If the user cancels a subscription, it will remain valid until its expiration time.
Bonus tip:
The renewal period will vary from 5 to 30 minutes, depending on the original billing period. In addition to this, previously they are limiting the number of times a test subscription can be renewed only 6 times, now it is unlimited.
Code:
The sample app is very simple and it covers almost all common use cases, doesn’t consider all the use cases you will need in your app; keep that in mind before loading the copy-paste machine gun.
The source code is available on GitHub, use the below links to get the application.
One more thing to do, before executing the project you have to change the “applicationId” in the build.gradle(app) and also the “product_id” in the city_list.json file which is in the assets folder.
That’s it, now you can run the project, and voilà! It works like a champ.
Let me know how your IAP implementation went in the comments below. Now you can implement IAP into your app and start generating some revenue by selling your app.
Jaison Fernando
Latest posts by Jaison Fernando (see all)
- Phone number auth using Firebase Authentication SDK - March 20, 2020
- Password-less email auth using Firebase Authentication SDK - March 9, 2020
- How to use SharedPreferences API in Android? - February 10, 2020